Wednesday, December 29, 2010

Christmas Crafting


Now that Christmas is over I can share some of the homemade things I did for Christmas presents :-) I will say that even though I find crafting fun, crafting to a deadline when you have 2 little boys to look after is STRESSFUL... Thanks to both my parents and the in-laws for all the baby-sitting! I think I'm going to have to start Christmas crafting in say June next year so I don't leave it until the last minute!

First up - Christmas Cards:

Next was some glass blocks with vinyl stickers of Christ from Stick By Me:


Then some frames... The little house frames were pretty labour intensive... I made my own letters by using 3 layers of cardstock, a layer of paper and then Crystal effects on top. And I had 9 families to do :-)

Next some handbags for my nieces - I made 3 of these. The pattern is from here.


Another small tote bag for a friend. This is loosely based on this tutorial from Homemade by Jill and is made out of tea towels :-)

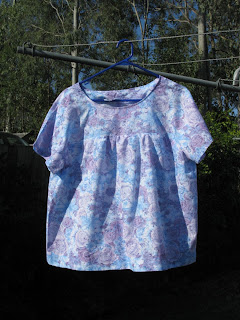
And last of all, this dress for my niece. The pattern is Simplicity 4711.

No wonder I was worn out by Christmas :-) I'm looking forward to moving onto more projects for me and my family now ;-)


Sunday, December 19, 2010

Retromummy giveaway!


Check out this giveaway from retromummy! The fabrics are so beautiful... and 20 fat quarters is a LOT of fabric :-) Fingers crossed... :-)

Saturday, December 18, 2010

Block Party

Almost a month ago now I attended a workshop with Adele where we made these blocks:

The pictures don't do justice to how good these look :-) They are about 7cm square and look great on my shelf. After finding out how easy they are to do (and after finding out that my husband has a drop saw and can cut the blocks for me!) I wandered off to Bunnings and bought some wood, and made some more smaller blocks for my Visiting Teaching sisters for Christmas. These smaller blocks are about 4 cm square (42mm to be exact...)


Then I made some blocks for my brother and his wife for their anniversary (just because I could!)


Thanks Adele for your quick and easy idea!

I won a giveaway!

Sew, Mama Sew! hosted a giveaway day last Monday where probably over a hundred blogs participated in offering giveaways. I went a little crazy and entered probably about 20 different giveaways on various blogs. And... I managed to win one! I won some fabric from The Crafty Nomad, who is a blogger from Western Australia :-) I can't wait until it arrives!

Tuesday, November 30, 2010

Skirt refashion


I know, I know, I'm still not posting very much. I still have a lot of catching up to do on this blog but I'd rather be crafting than writing about crafting :-)

I had this green layered skirt that was one of my favourite skirts to wear - just so comfortable. Unfortunately I bought it at my skinniest weight and so after 2 babies there was no way I was going to be able to fit into its non-elasticised waist...


So I unpicked the top two tiers of the skirt (the skirt originally came to below mid calf so I had plenty of length to work with), sewed them together to form one huge loop, shirred it, then sewed it onto the skirt.

Ta-da!

I have my skirt back! If I were to do it again, I'd attach the top tier before shirring it - I think it would just have been easier!

If you want more ideas on refashioning, check out http://www.newdressaday.com/ - the blogger gave herself a challenge of creating a new item of clothing a day for a whole year, with a budget of $1 a day. The transformations are amazing :-) Now, to raid some more op shops... :-)

Simply Modern Mom giveaway

Tiffany from Simply Modern Mom is having some great giveaways on her blog.

Check out the giveaway from Jessa ZG for some wall art - I like the "Dad Wins" print, and the height chart.

Dana from MADE is also giving away patterns on Simply Modern Mom. I've used Dana's Summer Vacation Dress pattern and her patterns are so easy to follow.

And check out the Starfish Jewellery giveaway.

And the best thing about these giveaways - they are open to international readers!

Sunday, November 21, 2010

Stampin' Up


I've also managed a little bit of time lately to stamp... Not as much as I'd like with Christmas coming up but with all the sewing I've been doing there hasn't been room on my desk for stamps! :-)

This first card was for a baby shower I attended a couple of weeks ago. I've used Bashful Blue, Certainly Celery and Whisper White cardstock. I've used the Scallop Border punch on the Certainly Celery to create the scalloped border. I stamped the Baby Tee's wheel with Staz On ink, and then water coloured the onesies, cut them out and stuck them on with Dimensionals. I've also embossed the background (which you can't see in this photo very well) with the Perfect Polka Dots embossing folder. The "It's a boy!" is from Nursery Necessities (unfortunately retired) and punched out with the Word Window punch.

Christmas Ideas! (Which I badly need... cause December is just too close now...) I hosted my own workshop with Debbie a few weeks ago now, where we made the patchwork Top Note card and the little red Milk Carton. Then I attended her November Stamp-a-Stack where we made the lolly tube, gift boxes, felt flower clips, apron card and a lollipop flower (which was grabbed by my son before I got a chance to take a photo...).

This card I made on Saturday for my niece's birthday. I've used Melon Mambo, Basic Black and Whisper White cardstock, the Flight of the Butterfly and Sweet little Sentiments stamp sets, the butterfly punch, the Perfect Polka Dots embossing folder, and the Scallop Square and Timeless Type Big Shot Dies.

Now to just make a start on my Christmas cards!


Saturday, November 20, 2010

Stick By Me


I attended a Stick by Me party about 3 weeks ago. Stick by Me produces vinyl stickers that can be stuck pretty much anywhere - glass, walls, etc. I've been eyeing off their products for a while now and was really glad to have the chance to see their products for myself. My order arrived this morning and I couldn't wait to put it all together and show you! They've just brought out this image of Christ, which I've used here on a white glass brick (which I bought through Stick by Me). You can also add your own phrase - my pick was "My Redeemer Liveth". It was so easy to do (even for me who routinely gets things crooked) and looks so great on our shelf.

Monday, November 15, 2010

So much crafting...so little blogging...


It's definitely been a while between posts! I borrowed my mum's overlocker in order to get a little bit of Christmas gift sewing done. Well that little bit of sewing turned into a sewing marathon that I've finally just finished - and I still haven't done all the Christmas sewing I wanted to! Oh well. Here's a quick snapshot of some things I've made recently:

Some more Big Butt Baby pants

Shorts for me :-)
Pyjamas
Long cotton pyjama pants
Decorated t-shirts. The pirate image is from Lil' Blue Boo

I have more to show you over the next couple of days :-)


Wednesday, October 6, 2010

I went a little crazy...


Do you remember a few posts ago when I showed off the blocks and goofball that I made for my sister-in-law's baby shower? Well, as the baby shower came closer I found more and more tutorials that I wanted to try - I had the material, so I thought why not? ;-) So here's what I ended up making...

I had a couple of singlets put away that were a more t-shirt like material than your general singlet type ribbed material. So I decided to add a couple of sleeves and applique the middle...

(I'm actually working on my first ever tutorial to show you how to make these sleeves... Hopefully it will be up soon!)

A shirred baby skirt from Creation Corner... Yes I am a little addicted to shirring...


A pair of Big Butt Baby pants from the pattern by Made By Rae. These pants are designed with an extra panel in the back to be able to fit over cloth nappies. These are probably more like 3/4 length on a newborn, and I've added a couple of rows of shirring to the legs to make a cuff (yes, more shirring again ;-D)

A nursing cover from the pattern by Christina from Sometimes Crafter:

And I pulled out my Stampin' Up! supplies to make a card and decorate a gift bag:


It was so much fun to go a little crazy :-)

Monday, October 4, 2010

Antiqued Brisbane Temple picture


A few months ago while blog-surfing I came across this tutorial to make a temple block using an antiqued picture of the temple. And Kristyn from Lil' Luna was offering to antique other temple pictures. So I emailed a picture of the Brisbane Temple that Jason had taken. It took a little while, but the antiqued picture of the Brisbane Temple is finally there!


They also have the picture available with no words, and instructions for editing the picture to add your own phrase. Head on over and check it out!


Saturday, September 25, 2010

A present for my niece


I've been bitten by the sewing bug in a big way lately. (I've borrowed my mum's overlocker which is helping!) One of my nieces is turning 3 in a couple of weeks, and the dress I had bought her turned out to be too short. So I decided that I could probably make one. I found this pattern from MADE and thought it looked easy enough to do quickly in the limited time I get for sewing. I'm so glad I did. The pattern explains shirring so well that I've become a little addicted to it because of its ease and how effective it looks. For the bodice I cheated and bought a girls t-shirt from Target ($4 on sale) and sewed the shirred dress onto it. Then added a couple of yo-yo's and buttons and a row of broderie anglaise to the hem. I'm so glad with the way it turned out. I hope my niece likes it too!

Wednesday, September 22, 2010

Teaching my kids to be crafty


I was reading a blog the other day (I really wish I could remember which blog it was) where they wrote about how they felt that they were creative as an adult because their parents were both creative and allowed them access to art and craft materials to do whatever they want. It made me think about whether I am raising my kids to be creative. Son #1 definitely has an active imagination - its amazing what he can imagine something as simple as a skirt hanger to be - today it was a trumpet, previously its been a pogo stick or a conductors baton. But I struggle to let him be crafty - mostly because I hate the idea of having to clean up after him... (painting is a very special treat) and because I am such a hoarder that its hard to let him use things that I've been collecting for "just in case". But inspired by the aforementioned post and by the Useful Box on Playschool I put together a box with some of my collected craft items (pipe cleaners, ribbon, wool and stickers), paper and other items from around the house (like cupcake papers and cotton balls) to be used as his Useful Box. It's been a hit so far - he loves playing with his useful box. Granted that mostly at the moment it involves a lot of glue and not much else - luckily I only let him use a glue stick! And I'm still struggling with the whole "mess" aspect. But hopefully it will help my kids develop their own crafty sides.

Thursday, September 16, 2010

Check out Christy's blog

Christy from the blog "A Christy Production" is hosting a great giveaway. Christy makes all sorts of crafty things - she sews, beads and makes cards and all sorts of things. Head over there and check it out for your chance to win her giveaway

Thursday, September 9, 2010

Fathers Day card


I was trying to tidy up my craft desk the other day (cleaning up lasts about 5 mins... then I start a new project and you can't see the desk again) when I came across some Stampin' Up! demonstrator newsletters from my time as a demonstrator. In one they had an article all about punch art and had an example of this little house. So I decided to use the little house on my father's day cards. The quote you may recognise as the chorus from the song "Fathers" from the Children's songbook. I wanted to have that verse typed, but we had major computer issues over the past week. So I had to stick with handwriting. I'm pretty happy with the way this turned out - I'm so grateful for the fathers in my life - my father, father-in-law and most of all for my husband and the amazing job he does as the father of our children :-)

Wardrobe update... part 1


I've reached the point following Baby No 2's birth that maternity clothes look far too big, but my poor stretched abdominals aren't holding my stomach in well enough to look nice in my "normal" clothes (Physiotherapy started yesterday...). So I decided it was time to make myself some new shirts. I found this pattern on sewingpatterns.com - a US website which sell paper patterns for so much cheaper than you can find them in Australia, and then on top of that they often have sales eg all Simplicity patterns for $US1.99. This was Butterick pattern B5356 - a really simple design - the latest one I made I was able to make over 2 days (borrowing mum's overlocker helped too!). The purple floral material was a remnant I found at Big W, and the light purple stripe was from Spotlight.
I'm really happy with the way these turned out, and how flattering they are for my body shape at the moment. I think this will become one of my favourite patterns :-)

Saturday, August 28, 2010

Two birthday cards


We've had a couple of birthdays in our family recently so I sat down and made a couple of cards. I've use the same technique to make the flowers as in the framed flowers post. The smaller flowers are made using the largest flower on the Stampin' Up! Boho Blossoms punch. These cards were so quick and easy to put together (I love using my Big Shot to help things go quicker!)


Easy baby presents


My sister in law's baby shower is coming up, so I thought I'd put my crafting "skills" ;-) to good use and make a few things for the new baby. I found this tutorial on Obsessively Stitching for goofballs and had a go at it. Once again I didn't read the instructions all the way through (I'll learn one day) which is probably why my goofball looks more like a goof-egg... but it still works :-)


Then I saw this post on Skip to my Lou for fabric building blocks. This was such an easy thing to make - I actually managed to do them without making a mistake :-) The only thing I would do differently in future would probably be to use some sort of interfacing on the block to help it look more block shaped. I added a couple of little bells inside.


I hope the baby likes them!

Monday, August 23, 2010

Why I craft

I was looking through all the craft blogs I read (which is more than the list you see over there...) and I found this post on the blog "Cluck, Cluck, Sew". It summarises exactly why I craft - especially the last paragraph:

"Also I want to add (like this post isn’t long enough), that sewing is an important part of my day. Its the only thing that stays finished. Tomorrow I will get up and do this whole routine all over again, but that quilt top? Its FINISHED. There will always be toys to pick up, meals to cook, and toilets to scrub. Sewing is my sanity….and worth every minute."

Crafting is my release from the demands of two little boys and all the things that come with running a home. The neverending pile of laundry and trying to find that one missing sock (I wonder where it is...). The constant calls of "Mummy" and trying to toilet train. Trying to clean the house and think of what to cook for dinner. I love the chance to spend a few minutes to have some me time! Its my way of recharging my batteries.

This talk from President Dieter F Uchtdorf - "Happiness, Your Heritage" - also gives some more reasons as to why I enjoy crafting. I love being able to create things with my hands to help make my home life more beautiful. I hope that I will continue to have the opportunity of being able to craft and to share what I make with others.

Tuesday, August 10, 2010

Twin (or single) sheet teepee tent


This post has been a long time in the works :-) Having 2 little boys doesn't leave me much time for crafting but I'm slowly getting back into it.

The pattern for this tent is from this post.

I almost called this post "what not to do". I actually made 2 of these tents - one for my son and one for my nephew. Somehow I managed to completely stuff up the one for my son (luckily it will still work...) - instead of having 5 seams I ended up with 6. I'm not quite sure how since I cut the second sheet the same as the sheet for this tent. I probably shouldn't have rushed as much as I did.


Overall this was a nice easy pattern to follow and it sews up pretty quickly. Having most of the hems already finished really helps.

My son is pretty happy with it - hopefully his cousin is too!

One thing to note - a twin sheet is equivalent to an Australian single bed sheet. I was all set to make this tent from a double bed sheet when I looked at the dimensions and realised a double bed sheet was too big.

Friday, July 2, 2010

Framed Flowers


I saw this idea on the very talented Adele's blog. The flowers are so easy to make but they look so effective! This is my favourite type of craft - something that is quite simple to do, doesn't take too much time but looks so nice. All the papers, brads etc are from Stampin' Up!